Table of Contents generated with DocToc
NextTick 原理分析 nextTick 可以让我们在下次 DOM 更新循环结束之后执行延迟回调,用于获得更新后的 DOM。
在 Vue 2.4 之前都是使用的 microtasks,但是 microtasks 的优先级过高,在某些情况下可能会出现比事件冒泡更快的情况,但如果都使用 macrotasks 又可能会出现渲染的性能问题。所以在新版本中,会默认使用 microtasks,但在特殊情况下会使用 macrotasks,比如 v-on。
对于实现 macrotasks ,会先判断是否能使用 setImmediate ,不能的话降级为 MessageChannel ,以上都不行的话就使用 setTimeout
1
2
3
4
5
6
7
8
9
10
11
12
13
14
15
16
17
18
19
20
21
22
if (typeof setImmediate !== 'undefined' && isNative(setImmediate)) { macroTimerFunc = () => { setImmediate(flushCallbacks); }; } else if ( typeof MessageChannel !== 'undefined' && (isNative(MessageChannel) || MessageChannel.toString() === '[object MessageChannelConstructor]' ) ) { const channel = new MessageChannel(); const port = channel.port2; channel.port1.onmessage = flushCallbacks; macroTimerFunc = () => { port.postMessage(1 ); }; } else { macroTimerFunc = () => { setTimeout (flushCallbacks, 0 ); }; }
nextTick 同时也支持 Promise 的使用,会判断是否实现了 Promise
1
2
3
4
5
6
7
8
9
10
11
12
13
14
15
16
17
18
19
20
21
22
23
24
25
26
27
28
29
30
31
export function nextTick (cb?: Function , ctx?: Object ) let _resolve; callbacks.push(() => { if (cb) { try { cb.call(ctx); } catch (e) { handleError(e, ctx, 'nextTick' ); } } else if (_resolve) { _resolve(ctx); } }); if (!pending) { pending = true ; if (useMacroTask) { macroTimerFunc(); } else { microTimerFunc(); } } if (!cb && typeof Promise !== 'undefined' ) { return new Promise ((resolve ) => { _resolve = resolve; }); } }
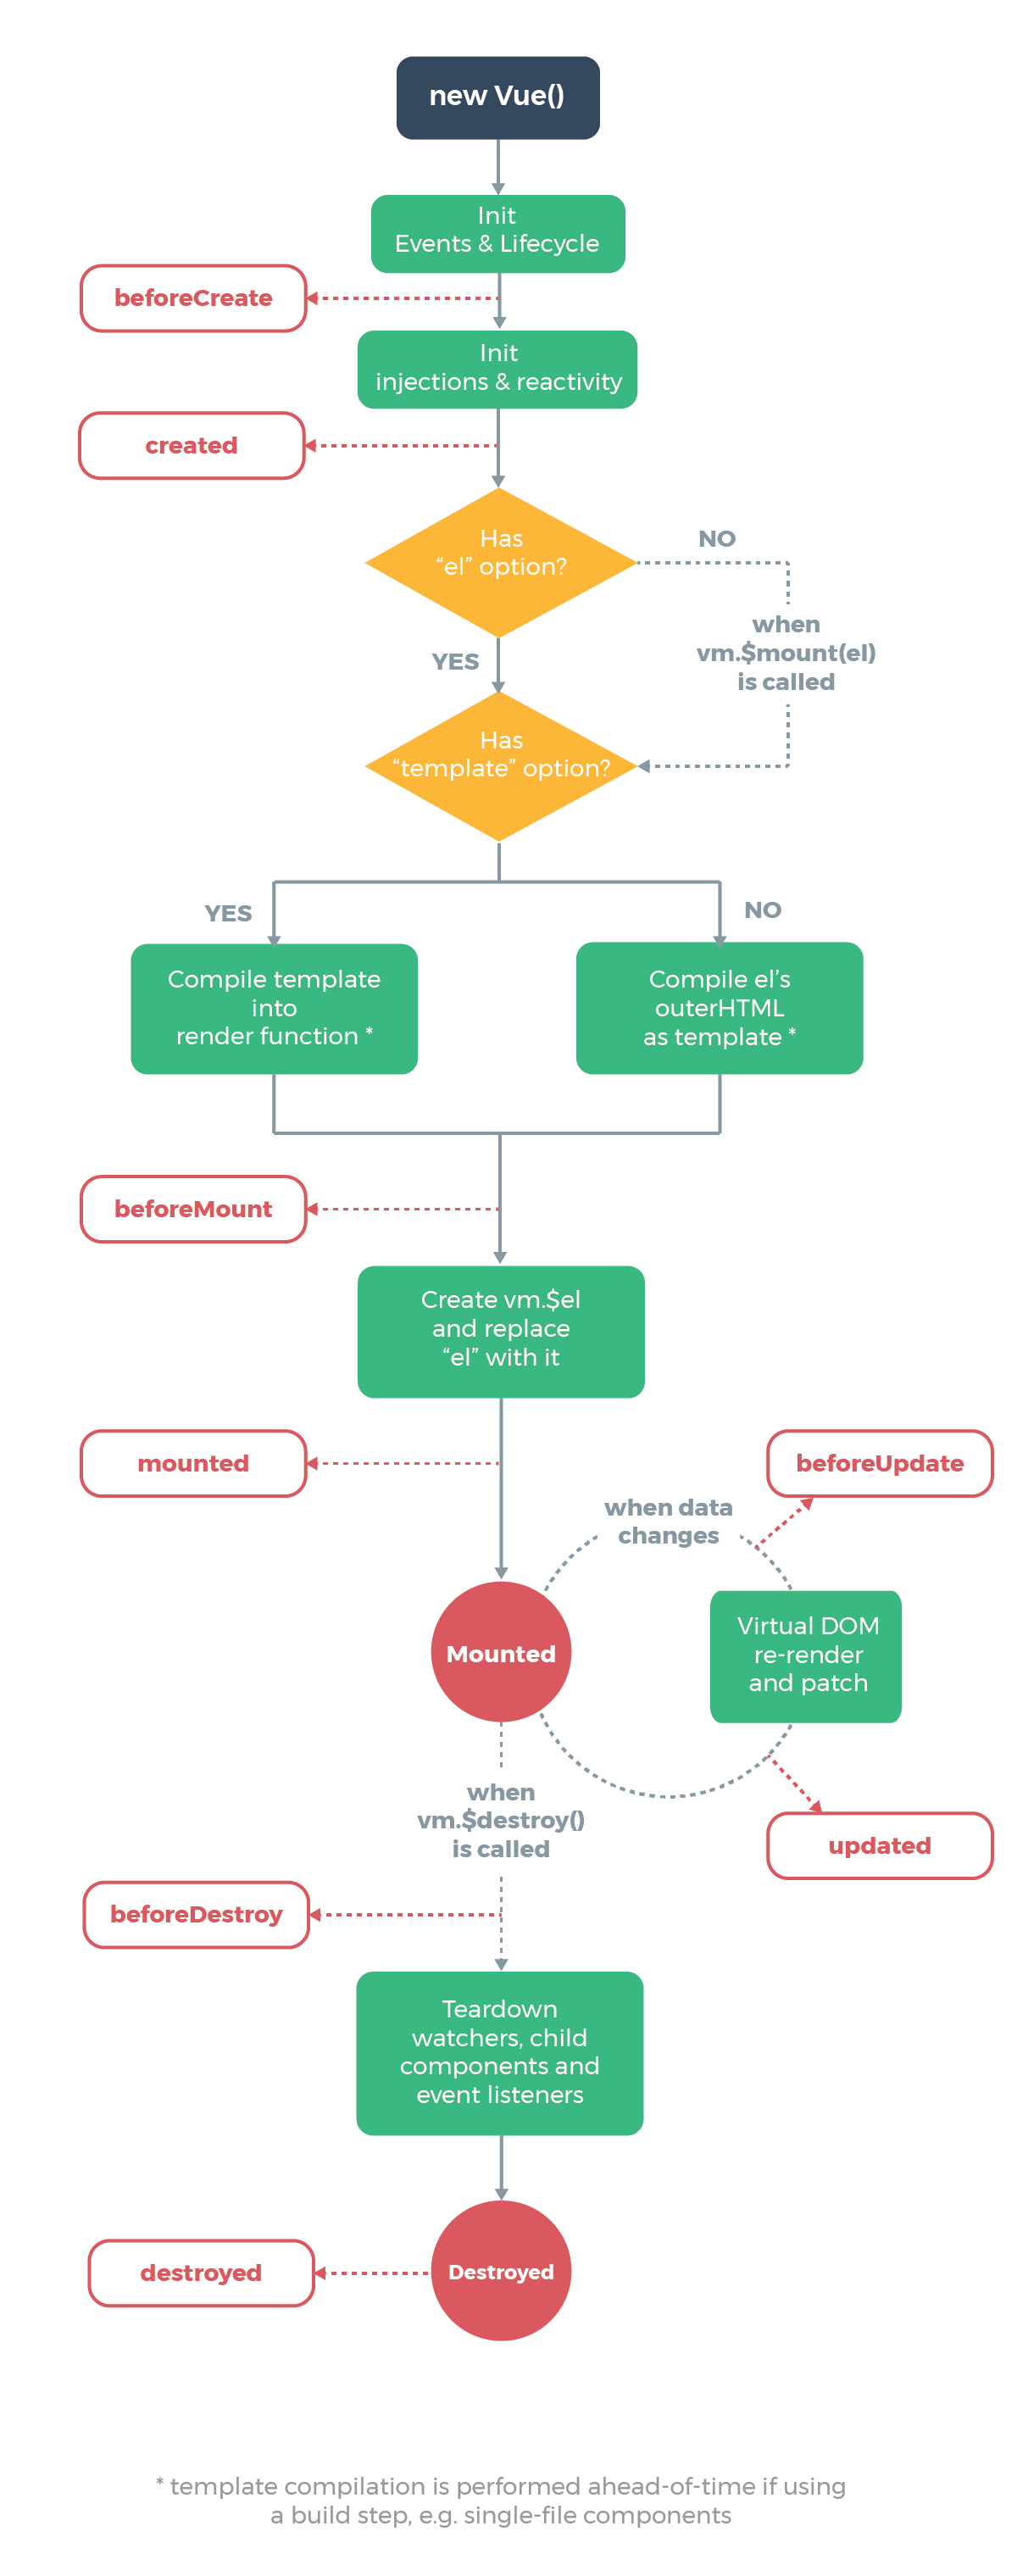
生命周期分析 生命周期函数就是组件在初始化或者数据更新时会触发的钩子函数。
在初始化时,会调用以下代码,生命周期就是通过 callHook 调用的
1
2
3
4
5
6
7
8
9
10
Vue.prototype._init = function (options ) initLifecycle(vm); initEvents(vm); initRender(vm); callHook(vm, 'beforeCreate' ); initInjections(vm); initState(vm); initProvide(vm); callHook(vm, 'created' ); };
可以发现在以上代码中,beforeCreate 调用的时候,是获取不到 props 或者 data 中的数据的,因为这些数据的初始化都在 initState 中。
接下来会执行挂载函数
1
2
3
4
5
6
7
8
export function mountComponent callHook(vm, 'beforeMount' ) if (vm.$vnode == null ) { vm._isMounted = true callHook(vm, 'mounted' ) } }
beforeMount 就是在挂载前执行的,然后开始创建 VDOM 并替换成真实 DOM,最后执行 mounted 钩子。这里会有个判断逻辑,如果是外部 new Vue({}) 的话,不会存在 $vnode ,所以直接执行 mounted 钩子了。如果有子组件的话,会递归挂载子组件,只有当所有子组件全部挂载完毕,才会执行根组件的挂载钩子。
接下来是数据更新时会调用的钩子函数
1
2
3
4
5
6
7
8
9
10
11
12
13
14
15
16
17
18
19
20
21
22
23
24
25
26
27
28
29
30
31
32
33
34
35
36
37
38
function flushSchedulerQueue ( for (index = 0 ; index < queue.length; index++) { watcher = queue[index]; if (watcher.before) { watcher.before(); } id = watcher.id; has[id] = null ; watcher.run(); if (process.env.NODE_ENV !== 'production' && has[id] != null ) { circular[id] = (circular[id] || 0 ) + 1 ; if (circular[id] > MAX_UPDATE_COUNT) { warn( 'You may have an infinite update loop ' + (watcher.user ? `in watcher with expression "${watcher.expression} "` : `in a component render function.` ), watcher.vm ); break ; } } } callUpdatedHooks(updatedQueue); } function callUpdatedHooks (queue ) let i = queue.length; while (i--) { const watcher = queue[i]; const vm = watcher.vm; if (vm._watcher === watcher && vm._isMounted) { callHook(vm, 'updated' ); } } }
上图还有两个生命周期没有说,分别为 activated 和 deactivated ,这两个钩子函数是 keep-alive 组件独有的。用 keep-alive 包裹的组件在切换时不会进行销毁,而是缓存到内存中并执行 deactivated 钩子函数,命中缓存渲染后会执行 actived 钩子函数。
最后就是销毁组件的钩子函数了
1
2
3
4
5
6
7
8
9
10
11
12
13
14
15
16
17
18
19
20
21
22
23
24
25
26
27
28
29
30
31
32
33
34
35
36
37
38
39
Vue.prototype.$destroy = function ( callHook(vm, 'beforeDestroy' ); vm._isBeingDestroyed = true ; const parent = vm.$parent; if (parent && !parent._isBeingDestroyed && !vm.$options.abstract) { remove(parent.$children, vm); } if (vm._watcher) { vm._watcher.teardown(); } let i = vm._watchers.length; while (i--) { vm._watchers[i].teardown(); } if (vm._data.__ob__) { vm._data.__ob__.vmCount--; } vm._isDestroyed = true ; vm.__patch__(vm._vnode, null ); callHook(vm, 'destroyed' ); vm.$off(); if (vm.$el) { vm.$el.__vue__ = null ; } if (vm.$vnode) { vm.$vnode.parent = null ; } };
在执行销毁操作前会调用 beforeDestroy 钩子函数,然后进行一系列的销毁操作,如果有子组件的话,也会递归销毁子组件,所有子组件都销毁完毕后才会执行根组件的 destroyed 钩子函数。
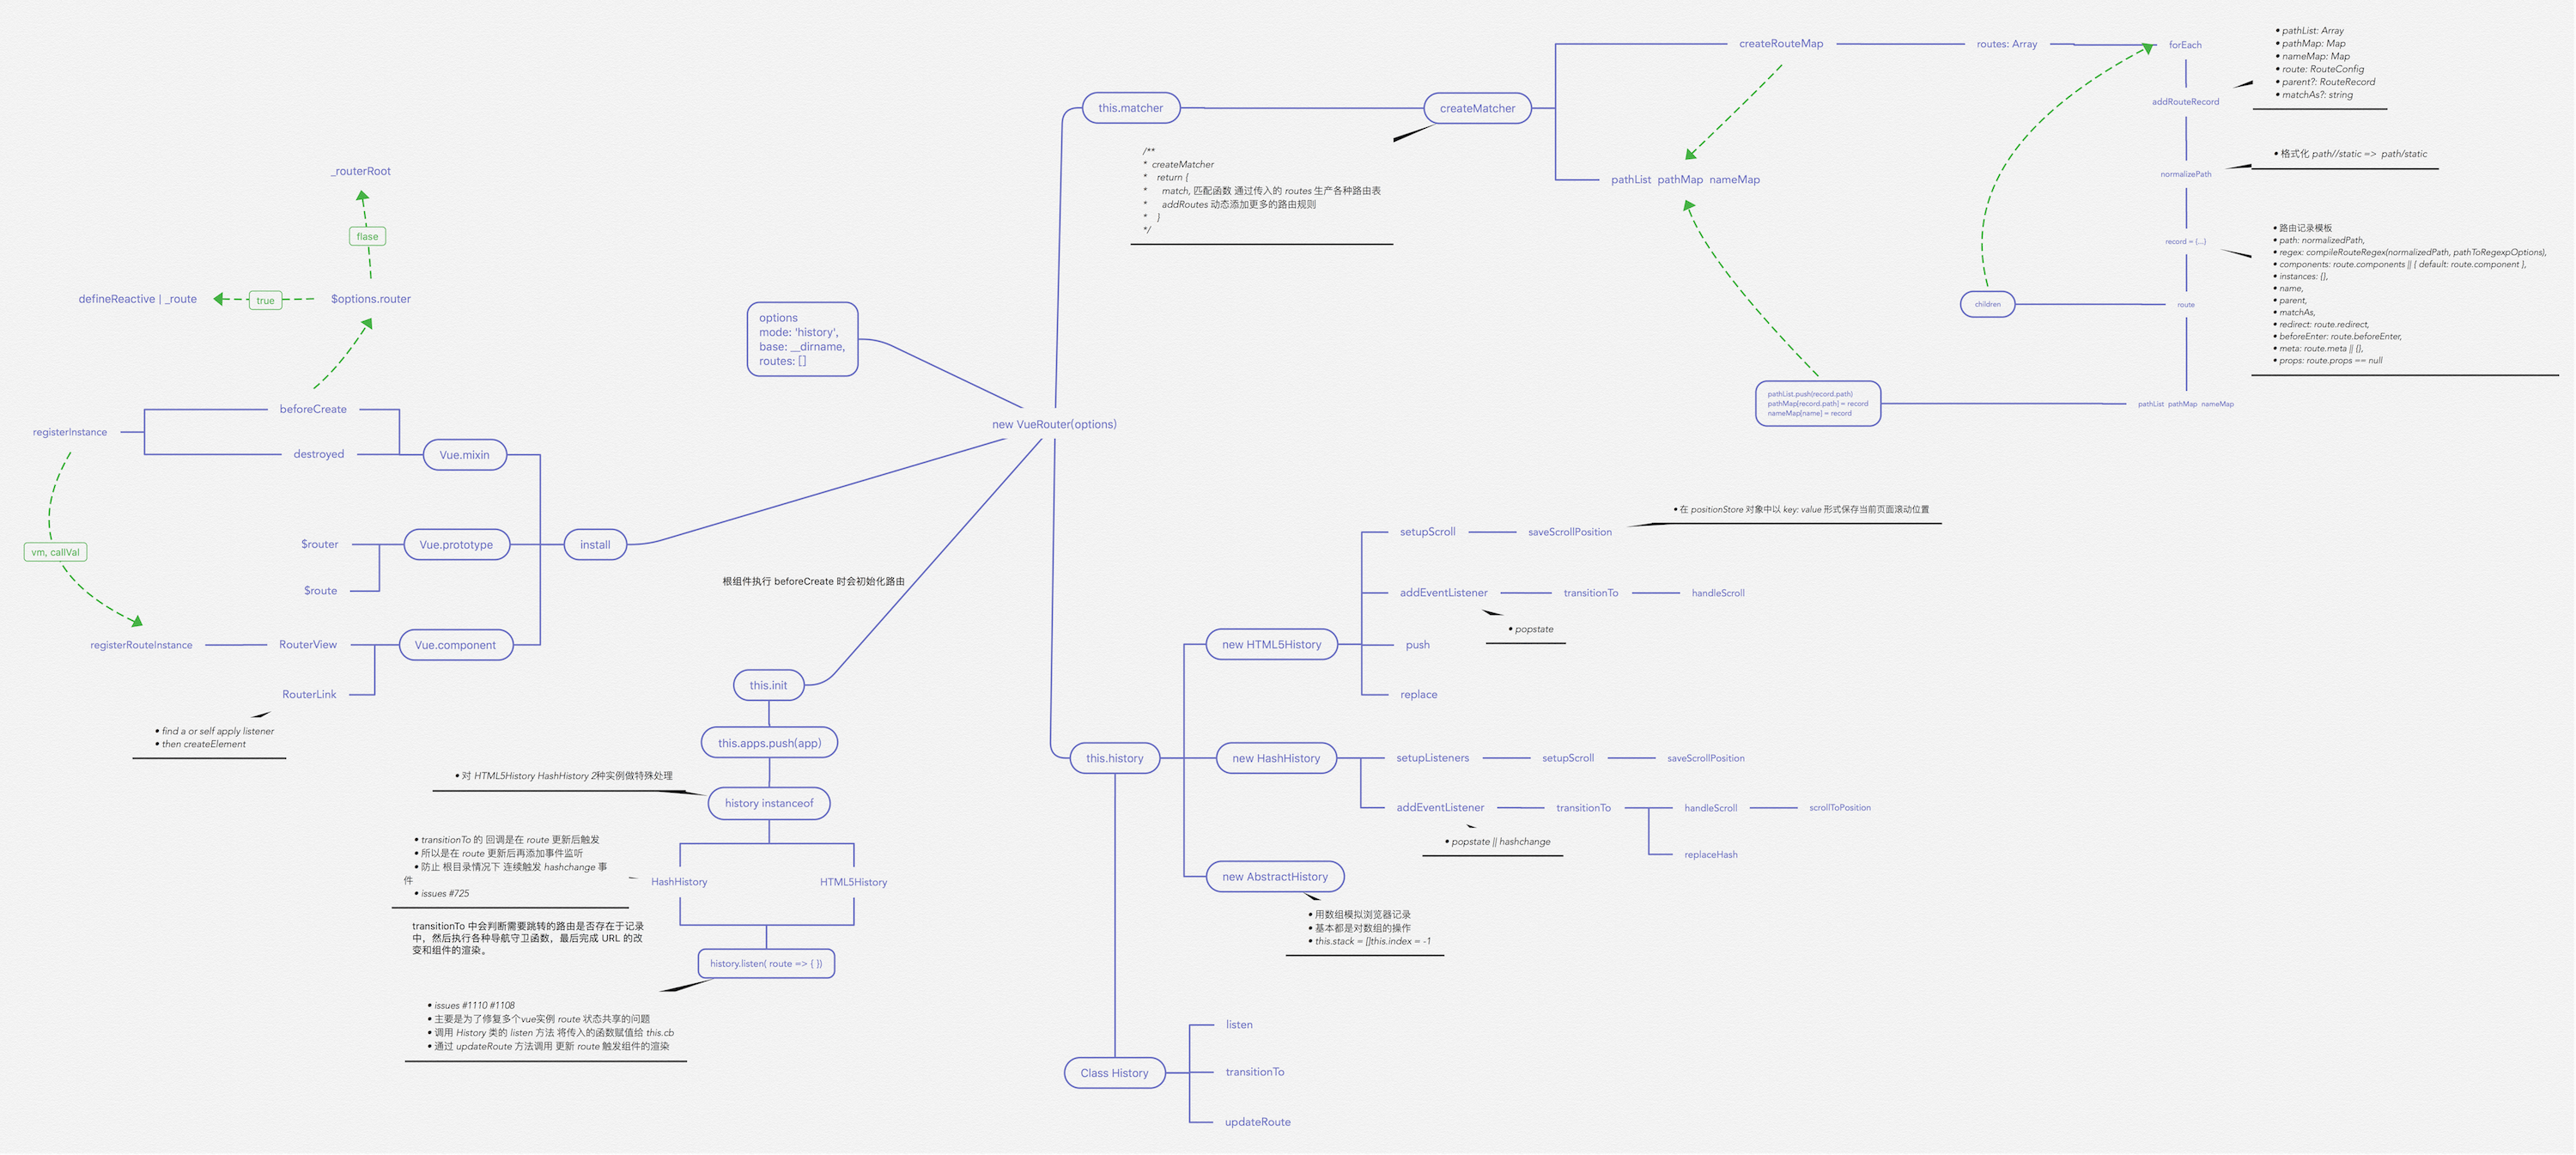
VueRouter 源码解析 重要函数思维导图 以下思维导图罗列了源码中重要的一些函数
路由注册 在开始之前,推荐大家 clone 一份源码对照着看。因为篇幅较长,函数间的跳转也很多。
使用路由之前,需要调用 Vue.use(VueRouter),这是因为让插件可以使用 Vue
1
2
3
4
5
6
7
8
9
10
11
12
13
14
15
16
17
18
19
20
21
22
export function initUse (Vue: GlobalAPI ) Vue.use = function (plugin: Function | Object ) const installedPlugins = this ._installedPlugins || (this ._installedPlugins = []); if (installedPlugins.indexOf(plugin) > -1 ) { return this ; } const args = toArray(arguments , 1 ); args.unshift(this ); if (typeof plugin.install === 'function' ) { plugin.install.apply(plugin, args); } else if (typeof plugin === 'function' ) { plugin.apply(null , args); } installedPlugins.push(plugin); return this ; }; }
接下来看下 install 函数的部分实现
1
2
3
4
5
6
7
8
9
10
11
12
13
14
15
16
17
18
19
20
21
22
23
24
25
26
27
28
29
30
31
32
33
34
35
36
37
38
39
40
41
42
43
44
45
export function install (Vue ) if (install.installed && _Vue === Vue) return ; install.installed = true ; _Vue = Vue; const registerInstance = (vm, callVal ) => { let i = vm.$options._parentVnode; if ( isDef(i) && isDef((i = i.data)) && isDef((i = i.registerRouteInstance)) ) { i(vm, callVal); } }; Vue.mixin({ beforeCreate ( if (isDef(this .$options.router)) { this ._routerRoot = this ; this ._router = this .$options.router; this ._router.init(this ); Vue.util.defineReactive(this , '_route' , this ._router.history.current); } else { this ._routerRoot = (this .$parent && this .$parent._routerRoot) || this ; } registerInstance(this , this ); }, destroyed ( registerInstance(this ); }, }); Vue.component('RouterView' , View); Vue.component('RouterLink' , Link); }
对于路由注册来说,核心就是调用 Vue.use(VueRouter),使得 VueRouter 可以使用 Vue。然后通过 Vue 来调用 VueRouter 的 install 函数。在该函数中,核心就是给组件混入钩子函数和全局注册两个路由组件。
VueRouter 实例化 在安装插件后,对 VueRouter 进行实例化。
1
2
3
4
5
6
7
8
9
10
11
12
13
14
const Home = { template : '<div>home</div>' };const Foo = { template : '<div>foo</div>' };const Bar = { template : '<div>bar</div>' };const router = new VueRouter({ mode : 'hash' , base : __dirname, routes : [ { path : '/' , component : Home }, { path : '/foo' , component : Foo }, { path : '/bar' , component : Bar }, ], });
来看一下 VueRouter 的构造函数
1
2
3
4
5
6
7
8
9
10
11
12
13
14
15
16
17
18
19
20
21
22
23
24
25
26
27
28
29
30
31
32
33
constructor (options: RouterOptions = {} ) this .matcher = createMatcher(options.routes || [], this ) let mode = options.mode || 'hash' this .fallback = mode === 'history' && !supportsPushState && options.fallback !== false if (this .fallback) { mode = 'hash' } if (!inBrowser) { mode = 'abstract' } this .mode = mode switch (mode) { case 'history' : this .history = new HTML5History(this , options.base) break case 'hash' : this .history = new HashHistory(this , options.base, this .fallback) break case 'abstract' : this .history = new AbstractHistory(this , options.base) break default : if (process.env.NODE_ENV !== 'production' ) { assert(false , `invalid mode: ${mode} ` ) } } }
在实例化 VueRouter 的过程中,核心是创建一个路由匹配对象,并且根据 mode 来采取不同的路由方式。
创建路由匹配对象 1 2 3 4 5 6 7 8 9 10 11 12 13 14 15 16 17 18 19 20 21 22 23 24 export function createMatcher ( routes: Array <RouteConfig>, router: VueRouter Matcher const { pathList, pathMap, nameMap } = createRouteMap(routes); function addRoutes (routes ) createRouteMap(routes, pathList, pathMap, nameMap); } function match ( raw: RawLocation, currentRoute?: Route, redirectedFrom?: Location ): Route } return { match, addRoutes, }; }
createMatcher 函数的作用就是创建路由映射表,然后通过闭包的方式让 addRoutes 和 match 函数能够使用路由映射表的几个对象,最后返回一个 Matcher 对象。
接下来看 createMatcher 函数时如何创建映射表的
1 2 3 4 5 6 7 8 9 10 11 12 13 14 15 16 17 18 19 20 21 22 23 24 25 26 27 28 29 30 31 32 33 34 35 36 37 38 39 40 41 42 43 44 45 46 47 48 49 50 51 52 53 54 55 56 57 58 59 60 61 62 63 64 65 66 67 68 69 70 71 72 73 74 75 76 77 78 79 80 81 82 83 84 85 86 87 88 89 90 91 92 93 94 95 96 97 98 99 100 101 102 103 104 105 106 107 108 109 110 111 112 113 114 115 116 117 118 export function createRouteMap ( routes: Array <RouteConfig>, oldPathList?: Array <string>, oldPathMap?: Dictionary<RouteRecord>, oldNameMap?: Dictionary<RouteRecord> pathList : Array <string>, pathMap: Dictionary<RouteRecord>, nameMap: Dictionary<RouteRecord>, } { const pathList: Array <string> = oldPathList || []; const pathMap: Dictionary<RouteRecord> = oldPathMap || Object .create(null ); const nameMap: Dictionary<RouteRecord> = oldNameMap || Object .create(null ); routes.forEach((route ) => { addRouteRecord(pathList, pathMap, nameMap, route); }); for (let i = 0 , l = pathList.length; i < l; i++) { if (pathList[i] === '*' ) { pathList.push(pathList.splice(i, 1 )[0 ]); l--; i--; } } return { pathList, pathMap, nameMap, }; } function addRouteRecord ( pathList: Array <string>, pathMap: Dictionary<RouteRecord>, nameMap: Dictionary<RouteRecord>, route: RouteConfig, parent?: RouteRecord, matchAs?: string const { path, name } = route; const pathToRegexpOptions: PathToRegexpOptions = route.pathToRegexpOptions || {}; const normalizedPath = normalizePath( path, parent, pathToRegexpOptions.strict ); const record: RouteRecord = { path : normalizedPath, regex : compileRouteRegex(normalizedPath, pathToRegexpOptions), components : route.components || { default : route.component }, instances : {}, name, parent, matchAs, redirect : route.redirect, beforeEnter : route.beforeEnter, meta : route.meta || {}, props : route.props == null ? {} : route.components ? route.props : { default : route.props }, }; if (route.children) { route.children.forEach((child ) => { const childMatchAs = matchAs ? cleanPath(`${matchAs} /${child.path} ` ) : undefined ; addRouteRecord(pathList, pathMap, nameMap, child, record, childMatchAs); }); } if (route.alias !== undefined ) { const aliases = Array .isArray(route.alias) ? route.alias : [route.alias]; aliases.forEach((alias ) => { const aliasRoute = { path : alias, children : route.children, }; addRouteRecord( pathList, pathMap, nameMap, aliasRoute, parent, record.path || '/' ); }); } if (!pathMap[record.path]) { pathList.push(record.path); pathMap[record.path] = record; } if (name) { if (!nameMap[name]) { nameMap[name] = record; } else if (process.env.NODE_ENV !== 'production' && !matchAs) { warn( false , `Duplicate named routes definition: ` + `{ name: "${name} ", path: "${record.path} " }` ); } } }
以上就是创建路由匹配对象的全过程,通过用户配置的路由规则来创建对应的路由映射表。
路由初始化 当根组件调用 beforeCreate 钩子函数时,会执行以下代码
1 2 3 4 5 6 7 8 9 10 11 12 beforeCreate () { if (isDef(this .$options.router)) { this ._routerRoot = this this ._router = this .$options.router this ._router.init(this ) Vue.util.defineReactive(this , '_route' , this ._router.history.current) } else { this ._routerRoot = (this .$parent && this .$parent._routerRoot) || this } registerInstance(this , this ) }
接下来看下路由初始化会做些什么
1 2 3 4 5 6 7 8 9 10 11 12 13 14 15 16 17 18 19 20 21 22 23 24 25 26 27 28 29 30 31 32 33 init (app: any ) this .apps.push(app) if (this .app) { return } this .app = app const history = this .history if (history instanceof HTML5History) { history.transitionTo(history.getCurrentLocation()) } else if (history instanceof HashHistory) { const setupHashListener = () => { history.setupListeners() } history.transitionTo( history.getCurrentLocation(), setupHashListener, setupHashListener ) } history.listen(route => this .apps.forEach(app => app._route = route }) }) }
在路由初始化时,核心就是进行路由的跳转,改变 URL 然后渲染对应的组件。接下来来看一下路由是如何进行跳转的。
路由跳转 1 2 3 4 5 6 7 8 9 10 11 12 13 14 15 16 17 18 19 20 21 22 23 24 25 26 27 28 29 transitionTo (location: RawLocation, onComplete?: Function , onAbort?: Function ) { const route = this .router.match(location, this .current) this .confirmTransition(route, () => { this .updateRoute(route) onComplete && onComplete(route) this .ensureURL() if (!this .ready) { this .ready = true this .readyCbs.forEach(cb => } }, err => if (onAbort) { onAbort(err) } if (err && !this .ready) { this .ready = true this .readyErrorCbs.forEach(cb => } }) }
在路由跳转中,需要先获取匹配的路由信息,所以先来看下如何获取匹配的路由信息
1 2 3 4 5 6 7 8 9 10 11 12 13 14 15 16 17 18 19 20 21 22 23 24 25 26 27 28 29 30 31 32 33 34 35 36 37 38 39 40 41 42 43 44 45 46 47 48 49 50 51 52 53 54 55 function match ( raw: RawLocation, currentRoute?: Route, redirectedFrom?: Location Route const location = normalizeLocation(raw, currentRoute, false , router); const { name } = location; if (name) { const record = nameMap[name]; if (!record) return _createRoute(null , location); const paramNames = record.regex.keys .filter((key ) => !key.optional) .map((key ) => key.name); if (typeof location.params !== 'object' ) { location.params = {}; } if (currentRoute && typeof currentRoute.params === 'object' ) { for (const key in currentRoute.params) { if (!(key in location.params) && paramNames.indexOf(key) > -1 ) { location.params[key] = currentRoute.params[key]; } } } if (record) { location.path = fillParams( record.path, location.params, `named route "${name} "` ); return _createRoute(record, location, redirectedFrom); } } else if (location.path) { location.params = {}; for (let i = 0 ; i < pathList.length; i++) { const path = pathList[i]; const record = pathMap[path]; if (matchRoute(record.regex, location.path, location.params)) { return _createRoute(record, location, redirectedFrom); } } } return _createRoute(null , location); }
接下来看看如何创建路由
1 2 3 4 5 6 7 8 9 10 11 12 13 14 15 16 17 18 19 20 21 22 23 24 25 26 27 28 29 30 31 32 33 34 35 36 37 38 39 40 41 42 43 44 45 46 47 48 49 50 51 52 53 54 function _createRoute ( record: ?RouteRecord, location: Location, redirectedFrom?: Location Route if (record && record.redirect) { return redirect(record, redirectedFrom || location); } if (record && record.matchAs) { return alias(record, location, record.matchAs); } return createRoute(record, location, redirectedFrom, router); } export function createRoute ( record: ?RouteRecord, location: Location, redirectedFrom?: ?Location, router?: VueRouter Route const stringifyQuery = router && router.options.stringifyQuery; let query: any = location.query || {}; try { query = clone(query); } catch (e) {} const route: Route = { name : location.name || (record && record.name), meta : (record && record.meta) || {}, path : location.path || '/' , hash : location.hash || '' , query, params : location.params || {}, fullPath : getFullPath(location, stringifyQuery), matched : record ? formatMatch(record) : [], }; if (redirectedFrom) { route.redirectedFrom = getFullPath(redirectedFrom, stringifyQuery); } return Object .freeze(route); } function formatMatch (record: ?RouteRecord ): Array <RouteRecord > const res = []; while (record) { res.unshift(record); record = record.parent; } return res; }
至此匹配路由已经完成,我们回到 transitionTo 函数中,接下来执行 confirmTransition
1 2 3 4 5 6 7 8 9 10 11 12 13 14 15 16 17 18 19 20 21 22 23 24 25 26 27 28 29 30 31 32 33 34 35 36 37 38 39 40 41 42 43 44 45 46 47 48 49 50 51 52 53 54 55 56 57 58 59 60 61 62 63 64 65 66 67 68 69 70 71 72 73 74 75 76 77 78 79 80 81 82 83 84 85 86 87 88 89 90 91 92 93 94 95 96 97 98 99 100 101 102 103 104 105 106 107 108 109 110 111 112 113 114 115 116 117 118 119 120 121 122 123 124 125 126 127 128 129 130 131 132 133 134 135 136 137 138 139 140 141 142 143 144 145 146 147 148 149 150 151 152 153 154 155 156 157 transitionTo (location: RawLocation, onComplete?: Function , onAbort?: Function ) { this .confirmTransition(route, () => {} } confirmTransition (route: Route, onComplete: Function , onAbort?: Function ) const current = this .current const abort = err => if (isError(err)) { if (this .errorCbs.length) { this .errorCbs.forEach(cb => cb(err) }) } else { warn(false , 'uncaught error during route navigation:' ) console .error(err) } } onAbort && onAbort(err) } if ( isSameRoute(route, current) && route.matched.length === current.matched.length ) { this .ensureURL() return abort() } const { updated, deactivated, activated } = resolveQueue( this .current.matched, route.matched ) function resolveQueue ( current: Array <RouteRecord>, next: Array <RouteRecord> ): updated : Array <RouteRecord>, activated: Array <RouteRecord>, deactivated: Array <RouteRecord> } { let i const max = Math .max(current.length, next.length) for (i = 0 ; i < max; i++) { if (current[i] !== next[i]) { break } } return { updated : next.slice(0 , i), activated : next.slice(i), deactivated : current.slice(i) } } const queue: Array <?NavigationGuard> = [].concat( extractLeaveGuards(deactivated), this .router.beforeHooks, extractUpdateHooks(updated), activated.map(m => resolveAsyncComponents(activated) ) this .pending = route const iterator = (hook: NavigationGuard, next ) => { if (this .pending !== route) { return abort() } try { hook(route, current, (to: any ) => { if (to === false || isError(to)) { this .ensureURL(true ) abort(to) } else if ( typeof to === 'string' || (typeof to === 'object' && (typeof to.path === 'string' || typeof to.name === 'string' )) ) { abort() if (typeof to === 'object' && to.replace) { this .replace(to) } else { this .push(to) } } else { next(to) } }) } catch (e) { abort(e) } } runQueue(queue, iterator, () => { const postEnterCbs = [] const isValid = () => this .current === route const enterGuards = extractEnterGuards(activated, postEnterCbs, isValid) const queue = enterGuards.concat(this .router.resolveHooks) runQueue(queue, iterator, () => { if (this .pending !== route) { return abort() } this .pending = null onComplete(route) if (this .router.app) { this .router.app.$nextTick(() => { postEnterCbs.forEach(cb => cb() }) }) } }) }) } export function runQueue (queue: Array <?NavigationGuard>, fn: Function , cb: Function ) const step = index => if (index >= queue.length) { cb() } else { if (queue[index]) { fn(queue[index], () => { step(index + 1 ) }) } else { step(index + 1 ) } } } step(0 ) }
接下来介绍导航守卫
1 2 3 4 5 6 7 8 9 10 11 12 const queue: Array <?NavigationGuard> = [].concat( extractLeaveGuards(deactivated), this .router.beforeHooks, extractUpdateHooks(updated), activated.map((m ) => m.beforeEnter), resolveAsyncComponents(activated) );
第一步是先执行失活组件的钩子函数
1 2 3 4 5 6 7 8 9 10 11 12 13 14 15 16 17 18 19 20 21 22 23 24 25 26 27 28 29 30 31 32 33 34 35 36 37 38 function extractLeaveGuards (deactivated: Array <RouteRecord> ): Array <?Function > return extractGuards(deactivated, 'beforeRouteLeave' , bindGuard, true ); } function extractGuards ( records: Array <RouteRecord>, name: string, bind: Function , reverse?: boolean Array <?Function > const guards = flatMapComponents(records, (def, instance, match, key ) => { const guard = extractGuard(def, name); if (guard) { return Array .isArray(guard) ? guard.map((guard ) => bind(guard, instance, match, key)) : bind(guard, instance, match, key); } }); return flatten(reverse ? guards.reverse() : guards); } export function flatMapComponents ( matched: Array <RouteRecord>, fn: Function Array <?Function > return flatten( matched.map((m ) => { return Object .keys(m.components).map((key ) => fn(m.components[key], m.instances[key], m, key) ); }) ); }
第二步执行全局 beforeEach 钩子函数
1 2 3 4 5 6 7 8 9 10 beforeEach(fn: Function ): Function { return registerHook(this .beforeHooks, fn) } function registerHook (list: Array <any>, fn: Function ): Function list.push(fn) return () => { const i = list.indexOf(fn) if (i > -1 ) list.splice(i, 1 ) } }
在 VueRouter 类中有以上代码,每当给 VueRouter 实例添加 beforeEach 函数时就会将函数 push 进 beforeHooks 中。
第三步执行 beforeRouteUpdate 钩子函数,调用方式和第一步相同,只是传入的函数名不同,在该函数中可以访问到 this 对象。
第四步执行 beforeEnter 钩子函数,该函数是路由独享的钩子函数。
第五步是解析异步组件。
1 2 3 4 5 6 7 8 9 10 11 12 13 14 15 16 17 18 19 20 21 22 23 24 25 26 27 28 29 30 31 32 33 34 35 36 37 38 39 40 41 42 43 44 45 46 47 48 49 50 51 52 53 54 55 56 57 58 59 60 61 62 63 64 export function resolveAsyncComponents (matched: Array <RouteRecord> ): Function return (to, from , next ) => { let hasAsync = false ; let pending = 0 ; let error = null ; flatMapComponents(matched, (def, _, match, key ) => { if (typeof def === 'function' && def.cid === undefined ) { hasAsync = true ; pending++; const resolve = once((resolvedDef ) => { if (isESModule(resolvedDef)) { resolvedDef = resolvedDef.default; } def.resolved = typeof resolvedDef === 'function' ? resolvedDef : _Vue.extend(resolvedDef); match.components[key] = resolvedDef; pending--; if (pending <= 0 ) { next(); } }); const reject = once((reason ) => { const msg = `Failed to resolve async component ${key} : ${reason} ` ; process.env.NODE_ENV !== 'production' && warn(false , msg); if (!error) { error = isError(reason) ? reason : new Error (msg); next(error); } }); let res; try { res = def(resolve, reject); } catch (e) { reject(e); } if (res) { if (typeof res.then === 'function' ) { res.then(resolve, reject); } else { const comp = res.component; if (comp && typeof comp.then === 'function' ) { comp.then(resolve, reject); } } } } }); if (!hasAsync) next(); }; }
以上就是第一个 runQueue 中的逻辑,第五步完成后会执行第一个 runQueue 中回调函数
1 2 3 4 5 6 7 8 9 10 11 12 13 14 15 16 17 18 19 20 21 22 const postEnterCbs = [];const isValid = () => this .current === route;const enterGuards = extractEnterGuards(activated, postEnterCbs, isValid);const queue = enterGuards.concat(this .router.resolveHooks);runQueue(queue, iterator, () => { if (this .pending !== route) { return abort(); } this .pending = null ; onComplete(route); if (this .router.app) { this .router.app.$nextTick(() => { postEnterCbs.forEach((cb ) => { cb(); }); }); } });
第六步是执行 beforeRouteEnter 导航守卫钩子,beforeRouteEnter 钩子不能访问 this 对象,因为钩子在导航确认前被调用,需要渲染的组件还没被创建。但是该钩子函数是唯一一个支持在回调中获取 this 对象的函数,回调会在路由确认执行。
1 2 3 4 5 beforeRouteEnter (to, from , next) { next(vm => }) }
下面来看看是如何支持在回调中拿到 this 对象的
1 2 3 4 5 6 7 8 9 10 11 12 13 14 15 16 17 18 19 20 21 22 23 24 25 26 27 28 29 30 31 32 33 34 35 36 37 38 39 40 41 42 43 44 45 46 47 48 49 50 51 52 53 54 55 56 function extractEnterGuards ( activated: Array <RouteRecord>, cbs: Array <Function >, isValid: () => boolean Array <?Function > return extractGuards( activated, 'beforeRouteEnter' , (guard, _, match, key ) => { return bindEnterGuard(guard, match, key, cbs, isValid); } ); } function bindEnterGuard ( guard: NavigationGuard, match: RouteRecord, key: string, cbs: Array <Function >, isValid: () => boolean NavigationGuard return function routeEnterGuard (to, from , next ) return guard(to, from , (cb ) => { next(cb); if (typeof cb === 'function' ) { cbs.push(() => { poll(cb, match.instances, key, isValid); }); } }); }; } function poll ( cb: any, instances: Object , key: string, isValid: () => boolean if ( instances[key] && !instances[key]._isBeingDestroyed ) { cb(instances[key]); } else if (isValid()) { setTimeout (() => { poll(cb, instances, key, isValid); }, 16 ); } }
第七步是执行 beforeResolve 导航守卫钩子,如果注册了全局 beforeResolve 钩子就会在这里执行。
第八步就是导航确认,调用 afterEach 导航守卫钩子了。
以上都执行完成后,会触发组件的渲染
1 2 3 4 5 history.listen((route ) => { this .apps.forEach((app ) => { app._route = route; }); });
以上回调会在 updateRoute 中调用
1 2 3 4 5 6 7 8 updateRoute (route: Route ) const prev = this .current this .current = route this .cb && this .cb(route) this .router.afterHooks.forEach(hook => hook && hook(route, prev) }) }
至此,路由跳转已经全部分析完毕。核心就是判断需要跳转的路由是否存在于记录中,然后执行各种导航守卫函数,最后完成 URL 的改变和组件的渲染。